Inggris :
<?php
$tanggal = "2015-07-01"; //tgl yg akan di cari nama harinya
$query ="SELECT datediff('$tanggal',CURDATE()) AS selisih"; $data=mysql_query($query);
@$baca=mysql_fetch_array($data);
$selisih= $baca['selisih'];
$x = mktime (0 ,0 ,0 ,date("m") , date("d") +$selisih, date("y"));
echo date ("l" , $x );
?>
Indonesia
Selasa, 30 Juni 2015
Perulangan For Modulus di Tabel Dynamis PHP
<!DOCTYPE html PUBLIC "-//W3C//DTD XHTML 1.0 Transitional//EN" "http://www.w3.org/TR/xhtml1/DTD/xhtml1-transitional.dtd">
<html xmlns="http://www.w3.org/1999/xhtml">
<head>
<meta http-equiv="Content-Type" content="text/html; charset=utf-8" />
<title>Mod</title>
</head>
<body>
<form action="modlima.php" method="post">
<div>
<select name="selected">
<option value="2">2</option>
<?php
$i = 2;
while($i < 61) {
$value = ($i +1);
echo("<option value=".$value.">".$i."</option>");
$i++;
}
?>
Query : Pengurangan Tanggal Mysql
contoh :
SELECT checktime,tanggala, datediff(tanggala, checktime) as selisih FROM `checkinout` WHERE tanggala>0Menggunakan Operator Plus dan Minus
Contoh penggunaannya operator plus minus ( + / - ) adalah sebagai berikut :
SELECT '2010-01-01 00:00:00' + INTERVAL 1 DAY; -- Menambahkan 1 hari
SELECT '2010-01-01 00:00:00' - INTERVAL '30' MINUTE; -- Mengurangi 30 menit
SELECT '2010-01-01 00:00:00' - INTERVAL '1-3' YEAR_MONTH; -- Mengurangi 1 tahun dan 3 bulan
SELECT '2010-01-01' + INTERVAL '2' MONTH; -- Menambahkan 2 bulan
SELECT '2010-01-01' + INTERVAL '2-6' YEAR_MONTH; -- Menambahkan 2 tahun dan 6 bulan
SELECT '2010-01-01' - INTERVAL '1-3' YEAR_MONTH; -- Mengurangi 1 tahun dan 3 bulan
-- Menambahkan interval 3 tahun pada field tgl_transaksi dari database PHI-Minimart
SELECT tgl_transaksi + INTERVAL '3' YEAR from tr_penjualan;
Senin, 29 Juni 2015
Cara Mematikan windows update
copas full dari ( http://tutorial-mj.blogspot.com/2013/01/cara-menonaktifkan-windows-update.html )
Windows update biasanya sering kita jumpai pada saat komputer dimatikan dan ada pemberitahuan dan windows akan melakukan automatic update terhadap system. windows akan memperbaiki seluruh system dan meng-updatenya secara berkala jika kita menghidupkan fitur automatic windows update. Akan tetapi kebanyakan orang tidak menyukai fitur ini karena proses shutdown akan menjadi sangat lama, Komputer akan mati jika windows sudah selesai melakukan update seluruh system sehingga membutuhkan waktu yang lumayan lama. Untuk itu pada postingan kali ini saya akan berbagi tentang cara menonaktifkan windows update, berikut langkah-langkahnya:
1. Langkah yang pertama, masuk ke control panel pada windows.
2. Langkah yang kedua, klik pada pilihan system and security.
 3. Langkah selanjutnya, klik pada menu windows update.
 4. Keempat, setelah anda masuk ke menu windows update, klik change settings pada sidebar bagian kiri untuk mematikan windows update.
 5. Pada important update, klik dan pilih never check for updates, kemudian klik OK pada tombol bagian bawah.
 Semoga artikel ini bisa bermanfaat dan membantu ...
Windows update biasanya sering kita jumpai pada saat komputer dimatikan dan ada pemberitahuan dan windows akan melakukan automatic update terhadap system. windows akan memperbaiki seluruh system dan meng-updatenya secara berkala jika kita menghidupkan fitur automatic windows update. Akan tetapi kebanyakan orang tidak menyukai fitur ini karena proses shutdown akan menjadi sangat lama, Komputer akan mati jika windows sudah selesai melakukan update seluruh system sehingga membutuhkan waktu yang lumayan lama. Untuk itu pada postingan kali ini saya akan berbagi tentang cara menonaktifkan windows update, berikut langkah-langkahnya:
1. Langkah yang pertama, masuk ke control panel pada windows.
2. Langkah yang kedua, klik pada pilihan system and security.


Rabu, 24 Juni 2015
PHP : Eksport Data CSV dengan PHP
Dear all,
2 hari ini sibuk untuk eksport data ke csv dengan php dan formatnya harus sama dengan format yang diinginkan vendor yang menangani dynamics axapta..data satu dengan data lain harus enter...di belakang data paling terakhir ga boleh ada koma,,ga boleh ada tanda petik..pusing juga...sudah oprek sana sini ga ketemu..karena uda ketemu ini aku bagi contoh skriptnya
<?php
// Database Connection
$host="localhost";
$uname="root";
$pass="";
$database = "absensi";
$connection=mysql_connect($host,$uname,$pass);
echo mysql_error();
$tgl = date('Y-m-d H:i:s');
$tanto = date('YmdHis');
$filename = $tanto . ".csv";
//or die("Database Connection Failed");
$selectdb=mysql_select_db($database) or
die("Database could not be selected");
$result=mysql_select_db($database)
or die("database cannot be selected <br>");
// Fetch Record from Database
$output = "";
$table = ""; // Enter Your Table Name
$sql = mysql_query("select userid
,NIK
,NAMA
, DATE_FORMAT(checktime,'%m/%d/%Y %h:%i:%s' ) AS checktime
,(CASE WHEN verifycode = 0 THEN 'C/Masuk' ELSE 'C/Keluar' END ) as verifycodea
,STATUS2
,keterangan
,status
,(CASE WHEN machinenumber = '10.10.10.207' THEN 'NS-CL' WHEN machinenumber = '10.10.12.249' THEN 'NS-CL' ELSE 'SMK' END ) as lokasin from checkinout
WHERE STATUSUPLOAD!='OK'
order by userid,checktime desc");
$columns_total = mysql_num_fields($sql);
//$arrdata = array( $test['userid'],$test['NIK'],$test['NAMA'],$test['checktime'],$test['verifycodea'],$test['STATUS2'],$test['keterangan'],$test['status'],$test['lokasin']);
// Get Records from the table
$fp = fopen("log/" . $tanto . ".csv", "a+");
while ($row = mysql_fetch_array($sql)) {
$dataku="";
for ($i = 0; $i < $columns_total; $i++) {
$dataku .=''.$row["$i"]. ',';
}
//$output .=$dataku;
$dataku=substr($dataku,0,-1);
$output .=$dataku;
$output .="\r\n";
//$tulis = fputcsv($fp, $output);
}
fwrite( $fp, $output );
//header('Content-type: application/csv');
fclose($fp);
?>
Selasa, 23 Juni 2015
Auto Execution file exe di Windows Scheduler Windows 8
Sory pren ini full copas dari http://www.greytrix.com/blogs/sageaccpacerp/2013/08/20/auto-execution-of-exe-file-using-windows-scheduler-in-sage-300-erp/
Many-a-times, clients require executing a particular .EXE file in Sage 300 ERP on daily basis, for a specific time. Using Scheduling >> Reminder List, user would be able to get popup for setting up reminders, but cannot run EXE file automatically, making it a very tedious task, to do manually for each day. Hence, User need to run Task Scheduler from Windows >> Control Panel.
For instance, user may want to create “Price List Code” for each item in database on daily basis by using EXE file.
Hence, follow below steps to run EXE using Windows scheduler
 The New Stuff : Auto Generate OE Confirmation Report in PDF format in Sage 300 ERP
Greytrix have some unique solutions of Sage 300 ERP integration with Sage CRM, Salesforce.com and Magento Ecommerce. We offer 20+ add-ons for Sage 300 ERP. It also offers best-in-class Sage 300 ERP customization and development services to business partners, end users, and Sage PSG worldwide.
Many-a-times, clients require executing a particular .EXE file in Sage 300 ERP on daily basis, for a specific time. Using Scheduling >> Reminder List, user would be able to get popup for setting up reminders, but cannot run EXE file automatically, making it a very tedious task, to do manually for each day. Hence, User need to run Task Scheduler from Windows >> Control Panel.
For instance, user may want to create “Price List Code” for each item in database on daily basis by using EXE file.
Hence, follow below steps to run EXE using Windows scheduler
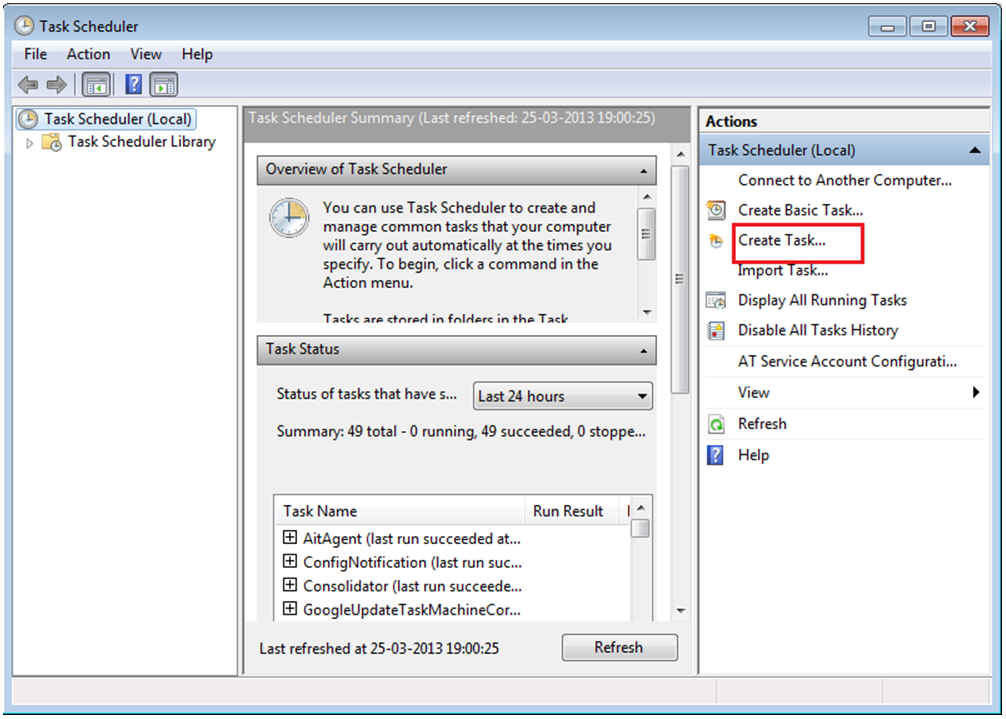
a) Navigate to Start >> Control Panel >> Administrative Tools >> Task Scheduler
b) Click on Task Scheduler >> Create Task option
b) Click on Task Scheduler >> Create Task option
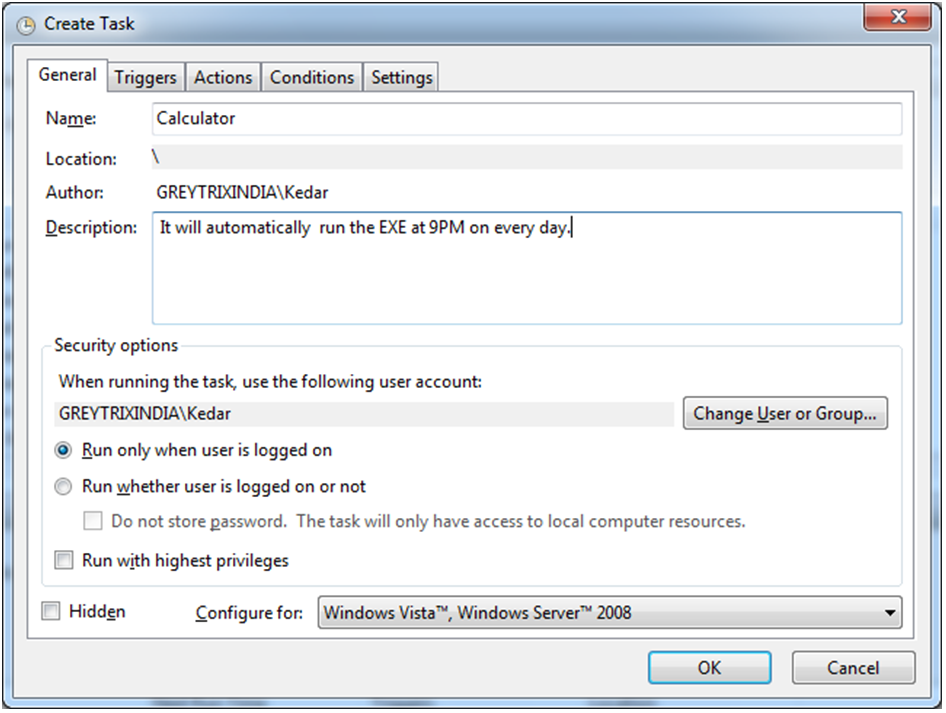
c) ‘Create Task’ UI will get opened. In General Tab, Enter Task Name.
d) In case you want scheduler to run even if user is logged off, then select the check box (Run whether user is logged on or not
e) Then navigate to Action tab and select New.
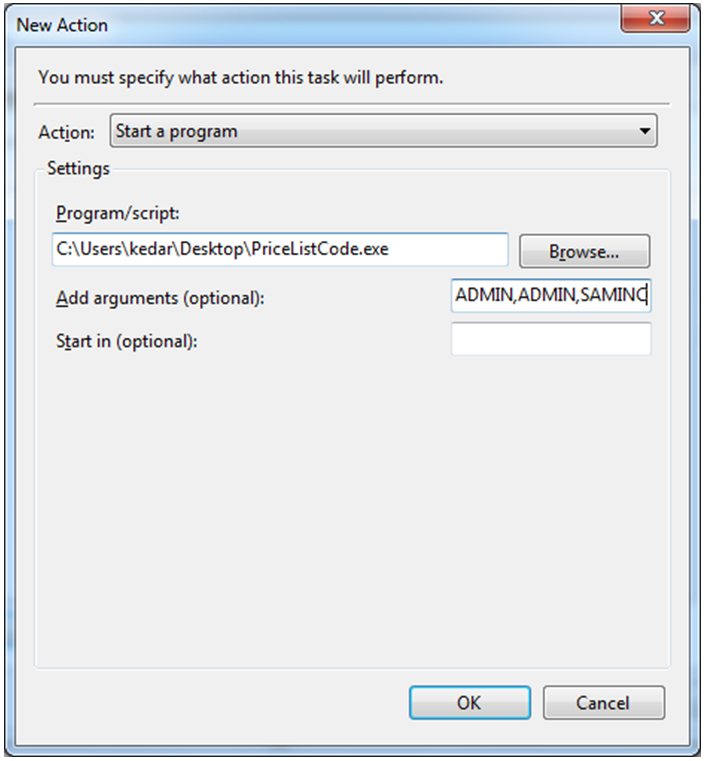
f) ‘New Action’ UI will get opened.
e) Then navigate to Action tab and select New.
f) ‘New Action’ UI will get opened.
g) In ‘Program/Script’ select ‘EXE’ file, for which you want to run using Browse button.
h) In ‘Add arguments (optional)’ field, enter Sage 300 User Id, Password, and Company Name. Separate these fields by comma (ADMIN,ADMIN,SAMINC)
i) Click on OK >> ‘New Action’ UI will get closed.
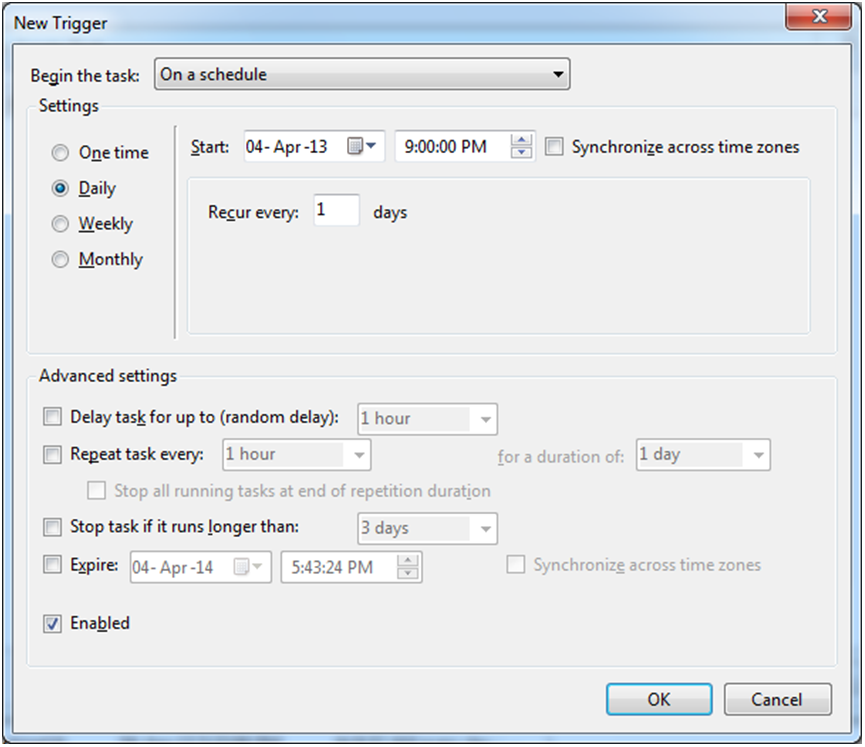
j) Now, navigate to Triggers Tab >> New >> ‘New Trigger’; an UI will get opened.
k) Add a scheduler to run the EXE.
h) In ‘Add arguments (optional)’ field, enter Sage 300 User Id, Password, and Company Name. Separate these fields by comma (ADMIN,ADMIN,SAMINC)
i) Click on OK >> ‘New Action’ UI will get closed.
j) Now, navigate to Triggers Tab >> New >> ‘New Trigger’; an UI will get opened.
k) Add a scheduler to run the EXE.
l) Click on OK >> New Trigger UI will get closed.
m) Now click on OK button in ‘Create Task’ UI.
n) A pop up will get opened asking for System User Id and Password. Enter details and click on OK.
As a result, EXE file would run on daily basis as set in windows
scheduler. Hence, making it easier for the users to automate their Sage
300 ERP process, reducing the time consumed to run EXE File on daily
basis.m) Now click on OK button in ‘Create Task’ UI.
n) A pop up will get opened asking for System User Id and Password. Enter details and click on OK.
Greytrix have some unique solutions of Sage 300 ERP integration with Sage CRM, Salesforce.com and Magento Ecommerce. We offer 20+ add-ons for Sage 300 ERP. It also offers best-in-class Sage 300 ERP customization and development services to business partners, end users, and Sage PSG worldwide.
Senin, 22 Juni 2015
Comdlg32.ocx not correctly registered; a file missing or invalid
Dapat problem lagi ni...SDK Fingerprint ga mau run..padahal file .dll sudah di copy ke system32 dan sudah setup.bat..cari lama banget ternyata belum ketemu...dan ternyata solusinya adalah cari file comdlg32.ocx di C:/windows/system32 dan C:/windows...apabila ada di salah satu folder itu maka copykan ke folder yang lain..namun apabila tidak ditemukan maka silahkan download comdlg32.ocx dan tempatkan di kedua folder itu.. Link Download :
windowsxp.mvps.org/utils/Comdlg32.zip
Selamat Mencoba
windowsxp.mvps.org/utils/Comdlg32.zip
Selamat Mencoba
New Xampp Security Concept Problem Solving
ada error begini :
This setting can be configured in the file "httpd-xampp.conf".
untuk solusinya adalah :
your xampppath\apache\conf\extra open file httpd-xampp.conf and find the below tag:
Restart xampp, and you are done.
In later versions of Xampp
...you can simply remove this part
New XAMPP security concept:
Access to the requested object is only available from the local network.This setting can be configured in the file "httpd-xampp.conf".
untuk solusinya adalah :
your xampppath\apache\conf\extra open file httpd-xampp.conf and find the below tag:
# Close XAMPP sites here
<LocationMatch "^/(?i:(?:xampp|licenses|phpmyadmin|webalizer|server-status|server-info))">
    Order deny,allow
    Deny from all
    Allow from ::1 127.0.0.0/8
    ErrorDocument 403 /error/HTTP_XAMPP_FORBIDDEN.html.var
</LocationMatch>
"Allow from all"
Restart xampp, and you are done.
In later versions of Xampp
...you can simply remove this part
#
# New XAMPP security concept
#
<LocationMatch "^/(?i:(?:xampp|security|licenses|phpmyadmin|webalizer|server-status|server-info))">
        Require local
    ErrorDocument 403 /error/XAMPP_FORBIDDEN.html.var
</LocationMatch>
Command Find Port di Command Prompt
misal ingin cari port 80sudah dipakai belum..kalau pakai netstat - ano banyak lihatnya pusing..jadi silahkan klik script berikut
netstat -abno | find ":80"Solusi Kedua Apache cannot start
From XAMPP Control Panel, under Apache, click the Config button, and select the Apache (httpd.conf).
Inside the httpd.conf file, somehow I found line that says:
Inside the httpd.conf file, somehow I found line that says:
Listen 80
Listen 8080
ServerName localhost:80

And change 80 to 8080.

ServerName localhost:8080
Listen 443
Listen 4433
<VirtualHost _default_:443>

ServerName localhost:443
<VirtualHost _default_:4433>

ServerName localhost:4433
Cara Mengetahui Port yang sedang berjalan
ketik netstat -ano
lalu tampilkan task manager dan cek pid yang muncul untuk mengetahui port tersebut dipakai oleh siapa
lalu tampilkan task manager dan cek pid yang muncul untuk mengetahui port tersebut dipakai oleh siapa
Minggu, 21 Juni 2015
SDK Fingerprint Fingersoft tidak terbaca
Pagi ini dapat problem, dimana SDK dari fingerprint tidak terbaca..padahal semua file .dll sudah tercopy semua ke windows/system32, ketika di run setup.exe keterangan not compatible x86 or x64...hampir satu jam tidak ketemu caranya ternyata...penyebabnya adalah kalo 64 bit copynya bukan di system32 tapi disini C://windows/sysWOW64
setelah itu voiiilaaaa SDK bisa di run...namun kalo tetap masih belum jalan ketik command berikut di cmd:
regsvr32 Zkemkeeper.dll
Lalu enter
Silahkan mencoba
setelah itu voiiilaaaa SDK bisa di run...namun kalo tetap masih belum jalan ketik command berikut di cmd:
regsvr32 Zkemkeeper.dll
Lalu enter
Silahkan mencoba
Kamis, 18 Juni 2015
Port Alternatif Apache dan MYSQL
Apabila anda mengalami error port di xammp untuk apache dan mysql, anda dapat mengganti port nya sebagai berikut :
1. Mysql dari port 3306 diganti menjadi 3307
2. Apache dari port 80 diganti menjadi 8079
1. Mysql dari port 3306 diganti menjadi 3307
2. Apache dari port 80 diganti menjadi 8079
Rabu, 17 Juni 2015
POST Content-Length exceeds the limit in XAMMP
ketika upload file dalam jumlah besar di xampp menemukan pesan error POST Content-Length exceeds the limit in XAMMP maka solusinya adalah masuk ke xampp/php/php.ini dan edit test berikut
upload_max_filesize = 1000M;
post_max_size = 1000M;
rubah dengan yang anda inginkan Selasa, 16 Juni 2015
Solving Error Apache XAMPP
Error ini biasanya disebabkan karena merubah xampp ke lokasi yang lain,,Error yang disebabkan semacam ini dapat diatasi dengan cara merubah path apche yang akan dieksekusi ke path apche yang baru.
- Buka registry editor: start > run > ketik: regedit > ok
- HKEY_LOCAL_MACHINE\SYSTEM\CurrentControlSet\Services\Apache2.2 (asumsi: service yang akan dirubah adalah Apache2.2)
- Klik kanan ImagePath pilih Modify
- Ubah value data
before: “C:\xampp\apache\bin\apache.exe” -k runservice
after: “E:\xampp\apache\bin\apache.exe” -k runservice - OK
Apache dan Mysql XAMPP always on
Saya memiliki masalah jadi ketika saya log off dari pc kemudian log in kembali service apache dan mysql di xampp selalu di on kan manual...nah berikut cara agar apache dan mysql di xampp menjadi service jadi ketika kita log in kembali service apache dan mysql otomatis on
Apache service install:
/xampp/apache/apache_installservice.bat
Apache service uninstall:
/xampp/apache/apache_uninstallservice.bat
Apache service install:
/xampp/apache/apache_installservice.bat
Apache service uninstall:
/xampp/apache/apache_uninstallservice.bat
Senin, 15 Juni 2015
Fatal Error: Maximum execution time of 30 seconds exceeded in phpmyadmin
To fix this, open the php.ini file from your xampp installation (I found my file here: C:\xampp\php\php.ini)
Then just change the value of the max_execution_time parameter from 30 to 60 seconds or greater.
Then just change the value of the max_execution_time parameter from 30 to 60 seconds or greater.
Langganan:
Postingan (Atom)